Thursday, August 24, 2006

Edirol R-09 SD cards

There seems to be a lot of confusion regarding supported SD cards for the R-09.
I contacted Edirol support and was informed that I should stick to Kingston, SanDisk or Lexar. I have tried both Kingston and SanDisk Ultra II 2GB SD cards and they work fine. I have firmware revision 1.03 in the R-09.

Tuesday, August 22, 2006

Edirol R-09
Nothing to do with kit cars!

I needed a highly portable recording device to record the choirs I sing in. I have used a succession of technologies over the years including a Sony Professional Walkman, Sony MiniDisk and Edirol UA25. I wanted uncompressed recording at 44.1 / 16 in order to create CDs completely in the digital domain. The UA25 is great but can not be regarded as a portable solution.

After a lot of deliberation, I chose and Edirol R-09. The main reasons :

  • AA battery power

  • Uncompressed 48 / 24 WAV

  • Uses SD cards up to 2GB

  • USB 2


The only negative with the R-09 is there is no support for balanced mics. This is not really an issue for me as I intend to use an Audio Technica AT 822 mic, an unbalanced X/Y stereo condenser mic.

Another issue is one of ruggedness. The case is of lightweight plastic construction. The most delecate part is the battery door. This is fiddly to open and is very fragile. I would have paid a bit more to have a more rugged device. I'll just have to be careful!

Tuesday, June 27, 2006

The end of the Mojo story!

This is a pic of my Mojo at Berth 22, Dock gate 4, Southampton Docks waiting to be loaded on the Sirrius Leader. It is bound for Yokohama in Japan.

A wonderful thing! The retest was a breeze! As Southampton had produced such a detailed list of the failures, it was a simple task to go through the failures assessing my rectification work. 45 mins and it was all over.

Friday, June 09, 2006

U-tube Manometers and brakes!
My Mojo failed its SVA because the brake fluid reservoir was deemed to be too low.
What I had done was mount the reservoir with the low fill line just above the master cylinder inlet. However this meant that the hose that connects the reservior to the master cylinder followed a torturous route going above the master cylinder and then below. In reality the route of the hose is irrelevant as long as there is a sufficient head of fluid above the master cylinder. This is 'O' level u-tube manometer stuff.

In order to satisfy the tester I had to do to 2 thnigs raise the reservoir and change the method by which the hose is attached to the master cyliner. Originally I had used a straight push-on adapter from Merlin. This meant that the hoses were attached vertically to the master cylinder accentuating the up and down hose path. I replaced thses with push on banjo fittings from AP Racing part number CP2623-41 (available from Demon Tweeks).


These are very nice peices of kit. They allow the hose to enter horizontally giving a much neater hose path.

Below is a picture of my now SVA compliant brake system.

Thursday, June 01, 2006

Bleeding Brakes!


I'm in process of getting my Mojo ready for it's SVA re-test. As I've had to dismantle some of the brake pipes, I have had to bleed the brakes.
There is a small issue when it comes to bleeding brakes on a Mojo or Riot. The rear calipers are from a Sierra and are mounted to an upside down Fiesta front upright. The consequence of this is the bleed nipple is lower than the inlet hose. This allows a cavity of air to exist between the hose inlet and the bleed nipple. No amount of bleeding will get rid of this air. The only satifactory way to bleed the rear brakes is to remove the rear calipers. Having done this a few time, I've got quite good at it!


Firstly find a peice of wood approx 2" x 2" and cut is diagonally to form 2 wedges.
Now remove one caliper at a time and fit the wedges between the piston and caliper. This will stop the piston coming out during the bleeding operation.


Then rotate the caliper so the bleed nipple is directly above the hose inlet. Now you can bleed as normal. Refit the caliper and repeat on the other side.


Wednesday, May 31, 2006

Quality Suppliers
Big thanks to Stefan Schreiber of Cohline. Cohline is a company you may not have heard of. They make hoses. One of my SVA failures was the hose I had used connecting the brake fluid reservoir to the master cylinders, I had the prove that it was suitable for use with brake fluid. I Had bought the hose from Merlin. The hose was marked "Cohline 2322 0613". I found and email for Cohline on Google and dropped them a line. I now have an official letter stating that the hose was designed for use with brake fluid.
Thanks also to Yokohama. I needed an official letter confirming the rolling circumference of my A032 tyres for speedo calibration. I gave them a call and 2 days later I had the letter!

Thursday, May 25, 2006

My Mojo failed its SVA on inadequate demisting. I was using a centrally mounted axial demister. There were 2 issues. Firstly it was deemed that there was inadequate fan assistence. Secondly there was not enough coverage of the windscreen. Beware of ads for products that purport to be SVA compliant, they probably won't be if your car is being tested at Southampton!

Here's my solution
2 X 12 volt 160 watt hair driers from www.towsure.co.uk @ £8.75 each.
2 X 70mm rocking vane dash vents from nfauto.co.uk @£9.95 each.
1 X 50cm length of 50mm aluminium heater conduit again from nfauto.
1 X 30 amp switching relay.
1 X blade fuse holder and 30 amp fuse.

There is ample room under the Mojo dash to mount the 2 driers end to end. I mounted a plate between them to stop the opposed fans from cancelling each other out! The 2 driers together will draw 27 amps, too much for most switches. I ran a feed wire from the ignition cutout switch through the 30 amp fuse to the relay which was wired in the usual way.
I removed the handles from the driers and bolted them to some aluminium angle. Some fettling of the plastic casing was necessary. I then made up a plate out of 16g aluminium that is bolted to the underside of the dash and the angle that holds the driers.
I used a hole saw to cut the holes in the dash top for the vents.
The aluminium conduit can now be used to link the driers to the vents.

A word of caution, 27 amps will flatten a battery very quickly! Only use the demister with the engine running and ensure that your cabling can take 30 amps.

Wednesday, May 24, 2006


Escort / Capri uprights or Sierra?

I have just responded to a posting on Sylva chat regarding castor, tail and the Seirra uprights.

Many SVA's have been failed on lack of self-centering. Even though cars apprear to have and adequate castor angle, they still lack self-centering. Why?

There seems to be two culprits. The first is friction. New steering racks can be very tight. The second is the Sierra upright geometry.

If you were to look from the side of a car and draw a line from the centre of upper ball joint to the centre of the lower balljoint and extend it, it should strike the ground in front of the tyre contact patch. This line is called the steering axis. The distance from this immaginary line to the centre of the contact patch is the amount of trail. It is trail that gives castoring effect.

On the sierra upright, the stub axle is offset to the front of the car. This reduces the relative distance between the steering axis and the contact patch, reducing the amount of trail. So 8 to 10 degrees of castor angle may yeild enough trail with an Escort upright where the stub axle passes through the steering axis. However this amount of castor angle will yeild little or no trail with a Sierra upright.

Why did Ford do this? Firstly the upright casting was not optimised for use with double wishbones on a 500Kg 2 seat sports car! Secondly, castor angle has other effects on steering, not just self-cenetering. Castor angle also yeilds negative camber gain on the outside loaded wheel as it is turned. It also adds a damping factor to the self-centering caused by jacking. When the wheel is turned, the castor angle tries to jack the fornt of the car up. Have a look at the picture above. The Sainsbury's trolly wheel has lots of trail but no castor angle. It centres but has a tendency to wobble. The next picture shows a typical car setup with trail genterated by castor. This gives trail, damping and camber gain. Camber angle and trail can be individually controlled by offsetting the stub axle with respect to the steering axis.

Conculusion. The effects of castor angle and tail must be investigated individually. Trial gives self-centering, castor angle, negative camber gain and damping. It is the lack of trail on Seirra based kit cars that causes a lack of self-centering. There are 3 remidies. Raceleda makes a Sierra upright replacement that has no offset. Dial in more castor. This will increase trail but will also affect steering feel and induce bump-steer as the position of the steering arms will have been altered, you have to add a lot to make a difference. The last option is to offset the top ball joint position in order to minimise the offset. The next kit I build will not have Sierra uprights!

Comments above are not necessarily those of Sylva Autokits.

Thursday, April 20, 2006

Oh dear!
My Mojo failed it's SVA!
5 hour test at Southampton followed by 3 pages of failures!

Defrosting / Demisting inadequate
I had fitted a ceramic heater with an axial fan in the centre of the dash. The tester objected to the fact that it did not have suffiicient reach to the off and near side.
Will fit 2 12 volt hair driers and vents from Europa.

Seat belt fixings inadequate strength
I had specifically fitted cap head bolts to the lower seat belt mounts as they are deemed by the SVA manual to be of satisfactory strength. The tester objected demanding that I prove the bolts are 8.8 grade or better. As the bolts are imperial (7/16 UNF) their grade is not measured in metric units e.g. 8.8! After a couple of calls, the tester relented and said we would accept the cap head bolts.

Rough edges
The wiper mechanism on the bulkhead was deemed to be contactable. If any part of ones body ever made contact with the wiper mechanism, they would be in serious trouble.
Will fit a cover under the dash.

Fog lap not bright enough
I had fitted an MSA approved LED fog lamp. It is really bright. However as it is not E marked, it is subjective.
Will fit an ugly E marked lamp

Exterior sharp edges
Rear silencer. My silencer is repackable and as such has an edge where the silencer can be dismantled. Will grind the edge.
Front coilover bases. Will cover with rubber.
Rear edges of head restreaints. Will fit wing piping.

Heat shield required for exhaust manifold.
The fuel feed pipe passes over the exhaust manifold. A shield is required to provent petrol contacting the manifold in the event of a leakage.
Heat sheild required between exhaust manifold and set backs.

Wiring.
Everything needs to be covered in spiral wrap!

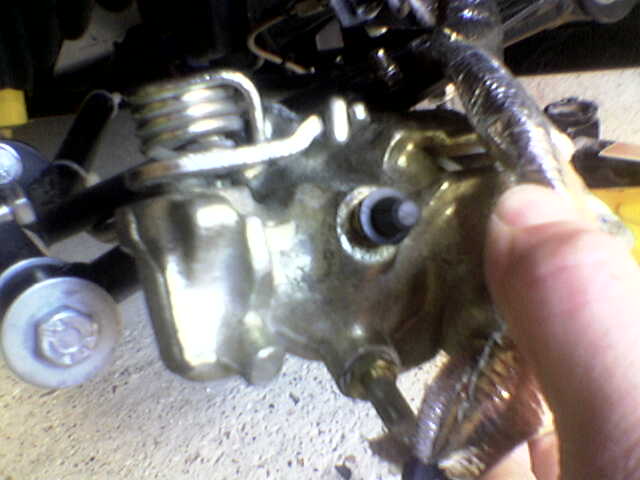
Brake caliper bolts insecure.
Even though new loctited bolts had been used, the tester must be able to visualise the locking mechanism. I will fit split washers.

Brake master cylinder reservoir too low.
Never heard of a U tube manometer? The reservoir was positioned so that the min fill line was just above the highest point in the hoses and about 30mm above the center line of the master cylinders. However the tester could not understand that the head of fluid "visible" to the master cylinder is actually greater than if the reservoir were actually connected to the master cylinder!
Will move the reservoir higher. A real pain as space is tight.

N/R rear brake hose too close to exhaust.
Will fit heat shield and cover the hose in heat reflective material.

Speedo
What a joke! I had at great expense installed a SPA digital speedo. I had installed the sensor and magnet on one of the driveshafts. The test rollers allow the wheels to rotate individually. The aggregate speed is measured. I have a standard open diff installed in the car. An open diff never drives each wheel the same. The results were meaningless. As the speedo is calibrated using the number of trigger points, in my case 1, and the rolling circumference of the tyre, I can get around this by having Yolohama send me proof of the rolling circumference and enter the value in the presence of the tester.

Brake reservoir hose
This is expensive stuff, over £15 a metre. Anyway, I have to get proof from the manufacture, Cohline, that the hose is suitable for brake fluid.

Rear view mirror
I had used a mirror from Halfords that attaches to the screen with a sucker. This is no good. The mirror must be permenantly attached.

Lessons learned
Don't go to an SVA station that does not do lorries! They have no intention to pass your car the first time.
Cover all wiring with spiral wrap
Your rear view mirror must be permenantly attached
Use only E marked lights or be ready to prove equivalence
Seat belt eye bolts must be stamped 8.8. Lower bolts must be either cap head or from the donor. If you use any other bolts, be prepared to prove they are 8.8 equivalent.
Fit a speedo that is calibrated in real units such as wheel rolling circumference. Bike speedos will not be accepted (I verified this).
Cover everything under the dash
If you have a full screen, make sure you have demist vents on both sides. One in the middle won't do.
If fuel pipe / hose passes over any part of the exhaust, there should be a shield to prevent fuel contacting the exhaust in the event of a leak.
Be prepared to prove suitability of any brake hose.

Friday, March 10, 2006

Welcome to Paul Kuzan's blog!