Monday, May 17, 2010

I took the fuel tank out in order to complete the pipework. I also wrapped rubber around the pipes where they emerge from the tunnel. Installing the drivers side tunnel side was a real pain. Next time I'll panel up to the the dash before installing the floor. The rest of the panel would be easily fitted later.


Still not sure about the fog and reverse lights. Trouble is there are very few positions that meet IVA requirements that are not too close to the exhaust. 


I would have liked to run a piece of angle down the passenger footwell attached directly to the 1" tubes. However the tank is a very tight fit in this area. I settled for the solution below. The angle itself adds rigidity to the footwell and is bonded to the side panel with Stikaflex. 

Friday, May 14, 2010

My least favourite job is now complete! I'm quite pleased with the result; no glue on the leather cloth! The last item needing covering is the tunnel top. Would have that too but I've run out of glue. On the subject of glue, I've always used Evostick. Ok, it is messy but smells great! This time I used a spray contact adhesive from Halfords. It has worked very well.


Here's the dash with the VDO gauges fitted. If you look carefully you'll see the immobiliser receptacle just above the hazard light switch. Wiring it in will be one of the next jobs.  
It's all the little jobs that take up so much time. Below is the hand brake switch. The switch is a changeover micro switch from Maplin. 


Wednesday, May 12, 2010

Above is a wiring diagram for a Cobra A8510 Cat 2 immobiliser. I shall be fitting it soon!

Monday, May 10, 2010

I fitted the engine cover today. Thanks to Jeremy for the stainless lift-off hinges. The front edge of the cover is supported by a 15mm aluminium angle and the bare GRP edge is covered with tight 'n' fast. The lift-off hinges securely attach the cover whilst allowing it to be removed.

The picture below shows the rear bulkhead panels.  I've only covered the exposed tops of the panels. If you look carefully you can see the holes for the button head cap screws that will screw into the rivnuts. Not sure if I'd do this again as it is tricky to get everything lined up. A better compromise would be to rivet the panels on and fit access panels. 

Next time in the workshop,  cover the dash and fit the drivers side tunnel. Both jobs I have been dreading!
My least favourite job, sticking on leather cloth. The only redeeming feature is the smell of Evo Stick!

With the internal panels done, I covered the top of the rear bulkhead panels. The panels are rivnutted to the chassis so I can easily remove them for maintenance.
Next jobs on the list are fitting the engine cover, wiring the hand brake warning light switch and riveting on the  drivers tunnel side.

Tuesday, April 06, 2010

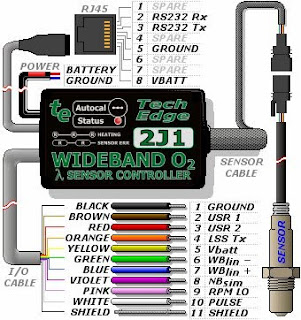
Emerald K3 and Tech Edge 2J1

Managed to spend some time in the workshop over the weekend. One of the pending jobs was to install a wideband lambda sensor. There were 3 options Innovate LC-1, DynoJet Wide Band 2 or Tech Edge 2J1.

The LC-1 has received some bad press recently, Emerald themselves are no longer recommending it even though it is the only product documented in the K3 manual. Another reason for not using the LC-1 is the messy installation. A 100 ohm resistor needs to be placed between the LC-1 out and K3 due to the sensitivity of the LC-1 output. Also the calibrate switch and status LED are remote from the unit itself requiring additional wiring and bracketry.

Next up, the DynoJet. Good kit, just too expensive.

That leaves the Tech Edge 2J1. This is very impressive kit at a great price.
Installation is a simple 4 wire hookup.


2J1 Power cable goes to a 5 amp ignition switched live and ground. When I make an ECU loom, I use a single ignition switched relay plugged into a holder that incorporates 3 fuses. I use one of these fused lives to power the lambda sensor and speedo sensor. The earth is connected directly to the battery along with the ECU.

2J1 I/O cable provides 0 - 5 volt wideband output WBlin+ on the blue cable and ground reference for wideband output WBlin- on the green wire.  WBlin+ goes to any user defined analogue input. I chose AuxIn35. WBlin- connects to pin 30 along with the temp and throttle position sensors. It is interesting to note that WBlin- is an input into the J21. WBlin+ signal will generated with reference to WBlin-.

The Tech Edge website has a page describing the differential output of WBlin+. Note that the 2J1  does not have a GND SHUNT jumper. The default configuration is perfect for the Emerald K3. However if connecting the 2J1 to a single-ended logger or ECU, you'll have to link the black and green wires in the I/O cable.


Next task is to tell the Emerald K3 about the sensor. In the K3, AFR / Lambda Input Configuration Screen, set the input source and enter the values below. 

Input Voltage      AFR
0                  9
1                  11   
2                  13
3                  15
4                  17 
5                  19   

Stoic 14.7 AFR = 2.85 V  which is almost in the middle of the voltage range making the default a good compromise.

Tuesday, March 16, 2010

Sylva J15 on the front cover of Complete Kit Car out on 19th March.


Wednesday, February 10, 2010

Just seen a posting on the JPSC forum about fitting 13" wheels on an IRS Sylva Striker.
I was a little surprised at the pictures of a professionally modified car (not by Sylva) that has the rear suspension load passing through a spherical rod end shank in bending. The drawing below shows the arrangement. Rods ends should not be loaded in a way that tends to bend the threaded shank. The entire mass of car + bump load + weight transfer and brake torque will be fed through shank of the rod end in shear. OK you could install a joint large enough to take the load, but it would be far too big and heavy. Another thing to bear in mind, threads make very effective stress raisers! 


Below is how it is done on a Sylva Riot. The shock mount is as outboard as possible and a metalastic bush is used to resolve the spring load. The bending load is minimal and what little there is is fed through the wishbone itself.
If the compliance of a metalastic bush can not be tolerated, a spherical bearing (not rod end) could be used instead. This is OK as it has no shank. It is normally installed in a machined housing and retained with a circlip. The housing is welded to the wishbone in place of the ferrule that retains the metalastic bush.

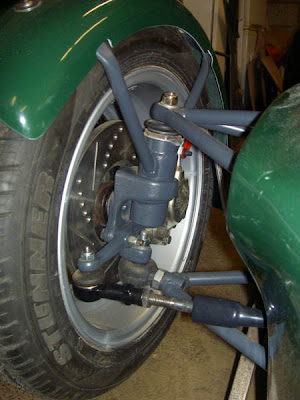
Sometimes this rule is broken. Below is a picture of the Riot front suspension. Braking torque is resolved through a rod end loaded in shear. Why is it OK to pass brake torque but not spring load through a rod end in this way? As mentioned above, spring load has many instantaneous components such as bump and weight transfer in addition to the mass of the car, the lower joint on a Riot's front suspension only has to resolve brake torque in shear and this is limited by the tyres. The rod end specified is well up to the job.


Wednesday, December 16, 2009

The Triumph has not left the garage since I rode it home last Saturday. Daily commuting duties have fallen to "The Trusty Steed", a Yamaha YBR 125. As I'm relying on it so much, I thought I'd show it some love.
A long overdue job was fitting new tyres. The original Cheng Shin tyres had about 1mm of tread left on the rear. Tyre sizes for the YBR are a bit strange, 90/90-18 on the back and 2.75-18 on the front. I ordered a set of Michelin Pilot Sportys from Micheldever Tyres. On Monday, I removed the wheels and had the tyres fitted. The difference is phenomenal. Anyone still using Cheng Shin tyres on their YBR 125 MUST change them for Michelin Pilot Sportys, they actually get warm and grip and they don't tramline  like the Chinese originals. 

 
The YBR 125 is built to a price. Components such as tyres, bulbs and mirrors are obviously low cost items that could benefit from upgrade. 
As I do most of my riding in the dark, I decided to to fit a halogen headlight bulb in place of the incandescent original . The bulb is 12v 35/35 watt with a BA20d fitting. I fitted a bulb made by Ring part number RMU417. They are available from AutoBulbsDirect for about £7. The difference is marked. The beam is much whiter and brighter. I had to realign the headlight as it was pointing too high with the new bulb.


Next, the mirrors and maybe a screen!

Sunday, December 06, 2009


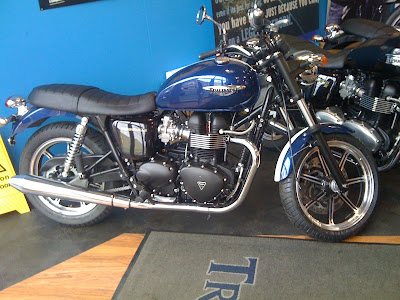
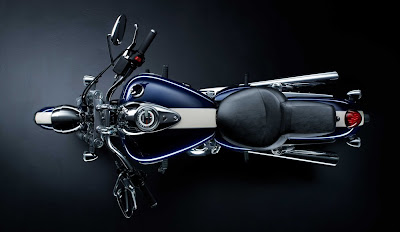
I've done it! Yesterday I  bought a new bike, a Triumph Bonneville. I could not resist the unique custom paint job. Its painted in Triumph Thunderbird Pacific Blue and Fusion White. Below is a picture of the Thunderbird that provided inspiration for the paint scheme.


I had a test ride at Three Cross Motorcycles and could not believe how easy it was to ride, far easier than the GS500 on which I took my test. The engine has oodles of torque ; no need to change down for roundabouts and it has a very progressive clutch. But the most impressive aspect of the bike was the handling. I was expecting a lumbering, heavy feel as this is a retro bike after all. However the bike tipped in very easily and felt very agile.

I have specified a few extras.
  • Tacho
  • Alarm / Immobiliser
  • Knee pads
  • Fork gaiters
  • Luggage rack
  • Center stand
  • Locking petrol cap - (why is this not standard?) 


I'll be keeping the YBR125 for rainy days when I need to commute.

Wednesday, November 11, 2009

Connecting a DynoJet Wide Band 2 to an Emerald K3 is very straightforward. You'll need a data acquisition cable (76950114) which is surprisingly optional on some kits.

Here's the wiring:-

WB 2               
violet            K3 analogue-in e.g. AuxIn35
white / violet    K3 pin 30, signal ground
red               3 amp ignition switched live
black             chassis ground
black / white     chassis ground 


Make sure that the pull-up resistor is not enabled for your selected analogue-in. This is done on the Input Channel Configuration screen. The 100 ohm buffer resistor, required for the Innovate LC1, is not required for the DynoJet Wide Band 2.

No configuration or calibration is required, the output is pre calibrated to (volts * 1.6) + 10 = AFR.

In the K3's AFR/Lambda Input Calibration screen set the input source to the analogue-in as used above and enter :-

Input Voltage   AFR
0               10
1               11.6 
2               13.2
3               14.8
4               16.4
5               18

After the ECU has been updated with these settings, it will be possible to read the current AFR from the live adjustments screen. It will also be possible to use the K3's adaptive mapping and closed-loop fueling capabilities.

Tuesday, November 10, 2009

My Riot has been neglected of late. I have recently sold my house in Christchurch. All of my superfluous paraphernalia is now stored in the workshop. Now we are in the process of moving again. This time 4 doors down the same street! This house has a garage! A rarity in Romsey.
Anyway the Riot. I'm thinking of changing the lambda sensor on my car yet again! Why? The Innovate LC1 is awkward to install and configure, has a very sensitive output and requires configuring and calibration.

My search for an alternative yielded products from TechEdge and DynoJet.


Reading various postings it would seem that both are superior to the Innovate product.
I have used DynoJet kit before and have been impressed so DynoJet it is.


Here are the benefits over the LC1.

Fixed configuration, no programming is required. The 0 - 5V analogue output is always (Volts * 1.6) + 10 = AFR.
Auto calibrating. No manual free-air calibration required.
Faster response.
Better packaging. No external push switch or LED. The sensor to controller cable can be cut to length.
Robust output. No need for an in-line buffer resistor.

With this in place, I should be able to map the low load sites as required for IVA and use adaptive mode for the rest.

Tuesday, October 06, 2009

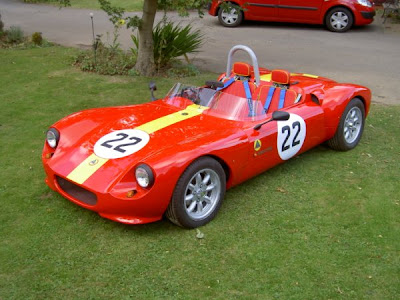
Latest pictures of the J15 from Jeremy.


Thursday, September 24, 2009

Below is the column of grief! I spent ages cutting the steering lock from the column fitted to my car. Then I found out that IVA required either a mechanical or electronic immobiliser. The original IVA manual stated that electronic installations need to be certified. No way was I going to pay to have someone fit an immobiliser to the car so I decided to go the mechanical route. Trouble was finding a Sierra column with keys. Anyway I managed to obtain one. Trouble is the steering lock operates on the steering wheel. My Mountney boss has no provision for this. Then I find out that the requirement for certification has been dropped and I can install an electronic immobiliser! Anyone need a Sierra column with key?
This is work in progress. The headrests in this position would not pass IVA. There must be less than 50mm gap between the top of the seat and the bottom of the headrest.
I know some builders don't like exposed fixings on their cycle wings. However I prefer a solid mechanical attachment. I chose to drill and tap the stays.

Thursday, September 17, 2009

IVA, IVA!

2 things have been causing me grief. The first one is immobilisation, the second, headrests.

The IVA manual was updated on 29/06/2009. The requirement for an electronic immobiliser installation to be certified has been dropped. This is great news as I was going to fit a new steering column incorporating a working ignition switch and steering lock. It would have meant cutting a big hole in the dash and altering the wiring.

I have been looking at the Cobra 8510 Cat 2 immobiliser. It is a touch-key dual-circuit unit. I can install it on the front bulkhead isolating the fuel pump and starter. All for £30.

Next issue, headrests. One has to be careful when fitting headrests, the IVA manual has very specific requirements. The headrest size must be 85 mm wide each side of the vertical centre line of the seat and at least 100mm high. So what happens if your headrest is round like mine? The top of the headrest must be no less than 753mm above the seat squab and there must be no more than a 50mm gap between the top of the seat back and the bottom of the headrest. I have a set of the Sylva / Intatrim seats. Next time I'm the workshop I'll measure them up and let you know!

Thursday, September 10, 2009

On Monday I passed my Direct Access bike test, completing Module 1 and 2 at the Lee on the Solent test centre. Its been quite a journey; CBT, theory and hazard perception tests followed by Module 1 and Module 2.

There has been a lot written about the off-road Module 1 test, specifically the high-speed avoidance / swerve test. The issue is not with the swerve, but attaining the required 50kph. Anyone doing Direct Access will have no trouble at all. However I have witnessed poor souls attempting it on 125 bikes and really struggling. On a DAS bike, go round the corner in second, as soon as you exit the curve, give it full throttle. As soon as the timing device has been crossed, roll-off the throttle and perform the swerve. When the bike is upright, break hard, don't hang around the stop-box comes up very quickly. I did not attempt it on my 125 but I saw an instructor do it. He put the bike into third after the corner and revved the nuts off it. I was lucky as it was dry. No allowance is made for the increased braking distance in the wet, your front wheel must stop inside the box.

Thanks to Steve at ADT for being patient.

I must also mention that my sister Mary also did Direct Access with me. The first time she got on a a bike was 4 days before the test! She did incredibly well, managed to attain all Module 1 speeds but put her foot down in the U turn. She will pass Module 1 next Monday I'm sure. Respect!

Thursday, August 20, 2009


Good news from our friends "Down-Under". The Sylva Riot chassis has passed the torsional rigidity test required by some Australian states for road registration. The Riot chassis exceeds 4000N.m./degree stiffness. The photo above shows the test being performed.

Friday, June 26, 2009


Something has been troubling me. The pic above shows how I have plumbed my brake master cylinder, the port marked P (closest to the push-rod) is plumbed to the rear, the port marked S plumbed to the front. So the primary circuit is the rear and the secondary the front. I plumbed the rearmost port to the rear and foremost to the front for neatness!

As the cylinder has a parallel bore, I don't think it makes much difference. However, the IVA test now assess the efficiency of the secondary brake circuit. See below..

IVA manual Section 09E
The secondary brake performance must be at least 30%,(of the
CLW or DGW as determined to be the highest) for each half of the
split system.

I don't want the IVA tester seeing P cast on the cylinder and assuming that the primary circuit is the rear!

I'm not sure if the P and S circuits share the same push-rod or if they have their own with an interposing spring. If a single push-rod is shared, it really makes no difference. Without pulling the cylinder apart, I can't tell. If anyone has taken apart their master cylinder, let me know!

Anyway, I'm going to re-plumb the brakes. This is a pain as I really dislike bleeding brakes.
For a sanity check, I had a look for pics of Caterham master cylinder installations, this is the same cylinder used in the Riot. The pic below clearly shows the P port (closest to the push-rod) plumbed to the front.


Same for the AP 13/16" cylinder.

Some good news, I have ordered an Innovate LC-1 wideband lambda sensor. More about that soon I hope.

Tuesday, June 09, 2009

Latest pics from the Sylva factory.