Sunday, February 15, 2009


Monday the 9th was probably the wettest day of the year, the day I took my CBT. Great! After 2 hours of riding in the pouring rain, I was eventually given my DL196. The following day I bought a 2008 Yamaha YBR125. I'm ready for my daily commute now.

The Riot, well not much has happened. I have fitted an air filter, fitted a new oil filter and filled it up with oil and finished the cooling plumbing. The dash wiring is done. I just need a whole day on the engine loom and we should be ready for a start!

Thursday, January 29, 2009


I've spent the last couple of days working on the wiring loom and dash.
I fitted the VDO instruments and switches including a Hella hazard switch as it has the requisite 7 connectors, a Lucas 2 way ignition switch and a push button starter. Delta rocker switches are used for head / sidelights and fog lights. I have not sorted the horn or dip / main switches yet.

Is this why people buy a Digidash? I was tempted but I feel the Riot is better suited to the more traditional discrete instruments even though they are an utter pain to wire up.

Next time in the garage I'll be tackling the engine bay including the ECU.

Wednesday, January 21, 2009

I really struggled yesterday. I could not find a suitable position for the fuse boxes, relays and flasher unit. I finally opted to mount them under the steering column cover. OK, I realize that I'll have to remove 6 bolts to change a fuse, however I'm hoping not to be doing that too often!

To make matters worse, 2 wires came adrift from the fuse boxes. It took me a while to work out how the fuse boxes come apart. I contacted Premier Wiring (new phone number 0131 554 0099) and they sent me some new crimp connectors.

You can also just make out at the top of the picture the 2 pieces of the loom coming through the bulkhead. Again a struggled to find an elegant solution for the cable routing.

Sunday, January 18, 2009

I had originally sourced a header tank from a Rover 214, however I wasn't too happy with its size.
Hunting around my local scrapyard, I found this header tank from a VW Golf. It fits very nicely in the space available. I am going to relocate the air filter. You can see the big 70mm elbow just below the header tank.

Below is the filter I'm considering. C7010 is the most compact filter with a 71 mm O/D neck.


I bought a loom from Premier, however the first thing I did was to pull it apart! I've removed the wiper, washer and heater wiring and significantly shortened the dash loom. I'm going to have to add wires for the fuel pump and fan relays, they are controlled by the ECU mounted in the rear.

Tuesday, January 06, 2009

Cracking the Colour Code!

OK a bit of an excuse! I haven't done any real work on the car over the Christmas period, too much singing!

What I have done is work out the colour coding for the Focus ECU loom. I tried Googling but have been unsuccessful finding the required information. So here goes!

My engine was supplied with the remnants of the Focus engine loom; it had been unceremoniously chopped off at the ECU. I want to use as many of the connectors and cables as possible. I have an Emerald K3 ECU, so I need to connect injectors, coil, idle air valve (IACV), coolant, air temp crank position (CPS), lambda and throttle position sensors (TPS), fuel pump, fan and tacho.

In general Ford looms use black wires for earth and brown for power. However this does not hold true for the engine loom.

Please be aware the the colours below are for a 1.6 Focus loom. Zetec powered Fiesta looms are similar but not the same.

Green / blue cable is an ignition switched live. It powers the injectors, coil, lambda heater and IACV.
Black cables with a trace colour are ECU controlled switched earths. These trigger the coils, injectors and IACV.
Brown wires with a trace colour are sensor grounds. These are for sensors that require an accurate ECU derived ground reference; connecting to the chassis won't do. These include the temperature sensors, TPS, CPS and lambda sensors.
White wires, solid or with a trace colour, carry signals from the temp sensors, TPS, CPS and lambda sensors.

OK so that's the high-level overview, now for the details.

Injectors
black / white cylinder 1 ECU 24
black / orange cylinder 4 ECU 24
black / yellow cylinder 2 ECU 23
black / blue cylinder 3 ECU 23
green / blue ignition +12v connect to power relay

Coil
black / green cylinders 1 and 4 ECU 25
black / orange cylinders 2 and 3 ECU 5 (watch out same as inj 4)
green / blue ignition +12v connect to power relay
(Not sure if the above is correct. I have switched 25 and 5)

Idle Air Control Valve
black / yellow switched earth ECU 3 (watch out same as inj 2)
green / blue ignition +12v connect to power relay

Coolant Temp
white / violet signal ECU 33
brown / white sensor ground ECU 30

Air Temp
signal ECU 16
sensor ground ECU 30
I don't have cable colours for this as the air temp sensor is in the Temperature and Manifold Absolute Pressure Sensor (TMAP) sensor in the Focus. Strangely the TMAP sensor is not mentioned in the Focus Haynes manual. Anyway I plan to use it. The K3 allows the temp sensors to be configured. It seems that Ford have standardised on the calibration of their temp sensors (air and coolant are the same).

0c = 94k ohms
50c = 11k ohms
100c = 2.2K ohms

I have not tried the above yet but will report back along with wire colours.

Throttle Position Sensor
brown / red sensor ground ECU 30
yellow +5v supply ECU 9
white 0 - 5v signal ECU 8

Crank Position Sensor
cable screen ECU 29 - one end only
white / red signal ECU 31
brown / red sensor ground ECU 32
Use shielded twisted pair microphone cable if not using Ford cable.

Lambda (Narrow)
white signal ECU 7
brown sensor earth ECU 18
green / blue relay controled +12v heater supply
black / yellow heater ground - connect to chassis

ECU pin 36 can be used as a switched ground to control the heater relay.
For wideband wiring see K3 manual.

Fan
ECU 6 switched earth

Fuel Pump
ECU 20 switched earth

Tacho
ECU 12 0-12v pulse

I think that's it! Please email me or leave a comment if I have made any errors.
Once I have tested the above, I'll post a page on the Sylva web site.

Thursday, December 11, 2008


Jeremy's new car is causing a bit of a storm in the press. It is really what the kit car industry has been waiting for; traditional in appearance but based on modern mechanicals (no Sierra diffs, gearboxes or uprights here!).
The picture above shows a Riot and a XYZ chassis side by side. As can be seen the ZYX chassis shares critical suspension dimensions with the Riot. However the main difference is the chassis sides, the XYZ are parallel. This will give a more capacious cockpit and allow the fitting of seats from suppliers such as Tillett or JK Composites. Another benefit is the tunnel is slightly wider at the front of the cockpit. This is a blessing as there is not much space in a Riot tunnel.
The XYZ has out-riggers which give enhanced side impact protection and provide mounting points for the body.
So out of the box the XYZ will be endowed the fine handling characteristics of the Riot.

And now for the body. No question this has been influenced by previous JP creations. Being mid-engined, the bonnet can be low and elegant. At the rear, the engine and gearbox are mounted to give sensible ground clearance without the need for expensive sumps or bellhousings.


In case you are wondering, yes this new body can be fitted to existing Riots! Of course you won't get the enhanced cockpit space and you will have to fabricate some outriggers to support the body, but the wheelbase and track are the same.

I will certainly be considering a XYZ body once my Riot SE has been SVA'd.

Jeremy's best? The XYZ chassis weighs slightly more than a Riot, but it will be very strong and roomy.


A shot of the controversial rear end!

Monday, November 24, 2008

No progress made on the car. However I have invested in a Emerald K3 ECU, a full set of VDO instruments and a Premier Wiring Systems loom. I hope to have a bit of a blitz over the Christmas period. It would be great to get is started this year.....

I'm going to mount the ECU as shown here on the Sylva demo car. This requires a bracket to be fabricated that bolts to the upper seat belt mounts.


Things to do before start..
  • 15mm header tank bottom hose take-off - completes cooling
  • Temperature sensor fitting head mounted sensor for ECU
  • Header tank mount
  • Air filter
  • ECU / engine wiring - not part of the purchased loom
  • Install main loom with fuel pump and fan relays
BTW, we did have a fun bonfire night!

Thursday, October 16, 2008

She did it raising nearly £6,000 for The Parkinsons Disease Society BTW! See Sarah's fundraising page here


Tuesday, October 14, 2008

It's Tuesday 14th and she's coming home!

Below you can see the finished fuel pump. I have extended it with steel rather than aluminium. Also that is in-tank hose being used!

So there it is, tank in place. The fuel system is complete. Just need to get some pipes made up by Ally Fab and the cooling system will be done too.

Wednesday, October 08, 2008

5/11 - Charca Huaylla Pass
No work on the car. A big walk for others.

Tuesday, October 07, 2008


Good progress was made over the weekend. As can be seen in the photo above, I have fitted the sender to the fuel tank and mounted the fuel filter. I also have plumbed in the radiator. I have had the hoses for ages but not managed to fit them because I could not finally fit the radiator as I needed something to put in the fan switch hole. I eventually got a switch from eBay. However I have just found out that Moss Europe sell an M22 x 1.5 blanking plug part number RFC014. In the picture you can just see that I have fitted the pedal box cover. This was made possible following the purchase of a rivnut setter. I bought a cheap rivnut tool a while back but it did not last long, the mandrel snapped. This time I bought Gesipa tool that should last a lifetime.

Another job waiting for the rivnut tool was the dash. Just need to fit the instruments and switches.
I have ordered a wiring loom from Premier Wiring Systems . I think £120 is good value for a loom with the correct colour wires. They are putting in extra wires and relays for fan, speedo and fuel pump and wiring the hazard switch! I'm going to use microphone cable to extend the Vepor speedo sensor cable. It is a VR sensor so has very low output and is suseptible to interference. Microphone cable is shielded twisted pair with very good noise rejection.

4/11 - no mobile signal. Will be another productive weekend!

Saturday, October 04, 2008

11 days to go......

Friday, October 03, 2008

The master cylinder that Sylva supplies for a Riot originates from a Caterham 7. It is Girling part number 74066147. I am led to believe that is has an 11/16", 17.46 mm bore. Since driving the latest Sylva demonstrator, which is fitted with a Willwood 1" bore master cylinder, I'm keen to increase the master cylinder size as I really liked the feel of the brake pedal. I could just fit the Willwood cylinder, but this means modifying the pedal box, something I'm not keen to do. 
I noticed that Caterham supply a 13/16" 20.64 mm bore master cylinder made by AP racing, part number 77176. From the picture below you can just make out that it even has an SVA compliant cap.


The standard master cylinder has an affective bore area of 239.42 and the AP product, 334.63. That is an increase of almost 40%. Sounds perfect! Problem is it is £164.50!  

Thursday, October 02, 2008

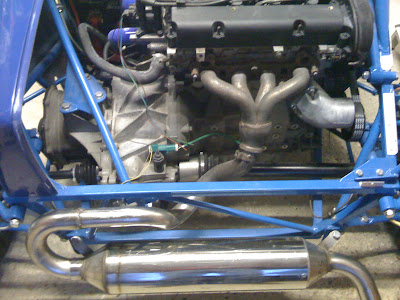
The picture below shows the Focus exhaust manifold attached to a Sylva silencer as requested. 
You may notice the engine now has a fan belt! As the engine is from a Focus, the alternator and tensioner are from a 1250 Fiesta, it's little wonder that neither a Focus or Fiesta belt fits! The crank pulley on the Focus is larger diameter than the Fiesta. I could have changed the pulley but that means redoing the cam timing; the Zetec SE has a keyless crank. So I investigated a different belt. The standard 1250 Fiesta belt is 1181 long. Looking at the Gates catalogue, the most suitable belt would seem to be 6PK1195, 14mm longer. This belt is fitted to BMW 750i and a Fiat Punto 1.9D! It also fits my Riot perfectly. 

I'm now working on the fuel tank and pump. Just waiting for some 8mm high pressure in-tank hose to be delivered. This is important as standard fuel hose is designed to convey fuel but not to be fully immersed in it! May have the tank in this weekend! 

Wednesday, September 24, 2008


Above is a pic of the rear of my Riot showing how the silencer with integral cat is mounted (just!).  You may notice that I'm not using the Sylva manifold. My engine came from a 1.6 Focus which has a nice 4 into 1 tubular manifold. Ok the plumbing may look like a musical instrument but it will save a bit of money. Another bonus is I'll be able to put my number plate on the engine cover not silencer. 

Decision has been made on the instruments; I'm going the ultra budget route. A Vepor dash will handle speedo, tacho and water temp. That will be supplemented with a VDO fuel guage and a Bright 6 LED array (indictors, charge warning, brake warning, main beam, oil pressure) . Thats it! 


Thursday, September 18, 2008


Today I managed to get the Riot out of the garage and clean the dust off. As the sun was shining I took a picture just to remind me that it is almost there!

Ok be honest, what do you think about the colour scheme? There are some, who shall remain nameless, who have been far from complimentary! Ok the body should have been Oxford blue.

I need to spend some money! It is a toss up between a tumble dryer and and ECU or DigiDash.....  As winter is coming, the dryer may win. 

I have been contemplating instruments. As I see it I have 3 choices, DigiDash, Vapor
or discrete VDO instruments as in the Sylva demonstrator. The DigiDash appeals, but at £375 + VAT and delivery, it is a bit expensive.  I am tempted to go the budget route and fit a Vapor dash, £60 +VAT from Rally Design. I will need to fit a fuel gauge as well.  


Tuesday, March 11, 2008

A post is well overdue!

Change of job and lack of disposable income due to work on the house has put a temporary halt to progress on the Riot. Anyway my house now has a beautiful new drive and patio and new drains!
I now work for a company called SpringSource as a consultant. They write Spring the open source Java/EE application framework.

Anyway, something top secret! Below is a picture from Jeremy at Sylva. It is a new chassis based on the Riot except it has parallel sides like the Mojo and additional side bracing. It is going to be clothed with an all new body. I think you can guess what the inspiration will be!

More soon,

Tuesday, May 29, 2007

Mojo Specs - for Yoshi
My Mojo 2 was fitted with a 130PS 1800 (RQB) Zetec E engine from a 1995 Ford Escort Cabriolet. It was fitted with a Weber Alpha Silver kit including 2 X 40 DCOE carbs and ignition ECU. This gives approx 155 BHP with the Sylva exhaust. See here for more info. http://www.webcon.co.uk/alpha/index.htm

Detailed engine information below:
Type: Zetec E Capacity: 1796cc Bore/stroke: 80.6 x 88 mm Compression ratio: 10.0:1 Max power: 130 bhp @ 6250 rpm Max torque: 120 lbf.ft @ 4500 rpm Cylinders: four, in line Cylinder head: aluminium alloy Block: cast iron Installation: mid-mounted, transverse Valve gear: high-lift double overhead camshafts, four valves per cylinder, toothed belt drive

The gearbox was a Ford BC unit originating from an Escort Mk3 XR3. It was rebuilt by Abbey Transminssions http://www.abbeytransmission.co.uk/
The final drive ratio is 3.84 : 1. The ratios are 1st 3.15, 2nd 1.91, 3rd 1.27, 4th 0.95, 5th 0.76 and reverse 3.61.

Wednesday, April 04, 2007

Latest Riot SE pic from Sylva
Note the screen! This car has a brand new 1.4 Sigma engine and an Emerald K3 ECU (which has yet to start). I think it looks great!
Not much done recently. The chassis is being powder coated and I'm assembling a of the donor parts.
One of the issues with the Sigma engine, iB5 gearbox and Mk2 XR2 driveshafts combination is the offside inner CV boot fouls the engine block. This CV joint must be repaced. There are many posts elsewhere on the Internet about this. I'm going to add to them!
The joint that is needed comes from a variety of sources, early Fiesta Mk2 XR2, 1.3 and 1.6 Mk3 Escort and Orion and 1.1 Mk3 Escort van. The good thing about inner CV joints is they don't wear as much as the outers. So if you come across one of these cars in the breakers, it would be quite straight forward to remove the joint and save yourself at least £30! (and get covered in CV grease - yuck!) Oh and believe it or not, Radical also use the same inner CVs!

Here are the part numbers:
Ford - 81TT-3K167-AA
Hardy Spicer - C7840
AMK - TDL3602R
Drive Line - DL3602

The CV boots are all the same and have an AMK part number of TSB31.